How to Make Screen Captures

As the old adage goes, “a picture is worth a thousand words”. This is certainly true in computing too. It is very common to capture things we want to remember or share. macOS has always had nice screen capturing capabilities but the images are captured to a static location. Here is how to take and file screen captures directly in DEVONthink.
First things first, in macOS Catalina and later, you need to go to System Preferences > Security & Privacy > Privacy, and enable DEVONthink under Screen Recording. If you don’t enable this, you will only get a capture of your desktop picture, nothing more.
Next, you need to show the Sorter, if it’s not already open. In DEVONthink go to Preferences > Sorter and choose Show as Menu Extra or Show as Dock Tab.
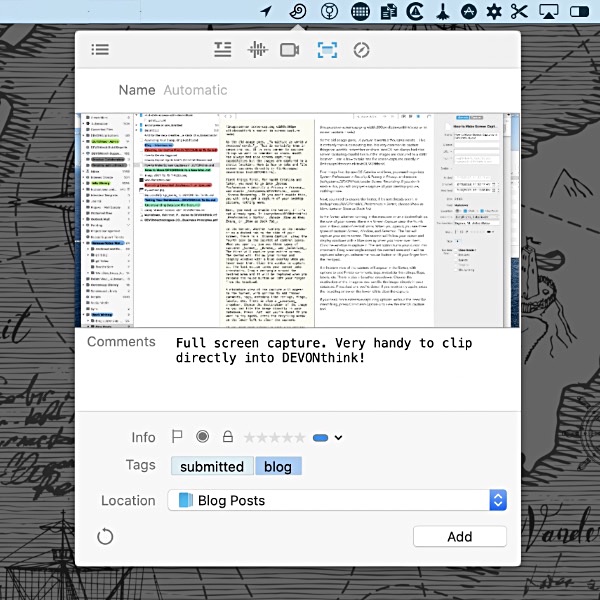
In the Sorter, whether running in the menu bar or as a docked tab on the side of your screen, there is a Screen Capture view; the fourth icon in the quintet of central icons. When you open it, you see three types of capture: Screen, Window, and Selection.
- Screen: This will obviously capture your entire screen.
- Window: Move your cursor and windows will appear with a blue overlay when you hover over them. Click the window to capture it.
- Selection: Your cursor will display as crosshairs. Drag a rectangle around the desired area and it will be captured when you release the mouse button or lift your finger from the trackpad.
A miniature view of the capture will appear in the Sorter. Options to add Finder comments, tags, metadata like ratings, flags, labels, etc. are available so you can add these items, if needed. There is also a Location dropdown. Choose the destination of the image so you can file the image directly into your database. When you’re ready to commit the capture, press the Add button and you’re done! If you want to try again, press the recycling arrow on the lower left to clear the capture.
If you need more extensive capturing options without the need for directly filing into DEVONthink, press ⌥⌘5 to view the macOS capture tool and explore the different functions it provides.
Note: This article deals with an older app generation. Interface elements, menu paths, and procedures could differ.
